VMware Virtual SAN (VSAN) is a hypervisor-converged storage solution for your vSphere environment. It was built to be extremely easy to use and administrator, high performance and expandable. In this post I will go over the requirements and how to prepare your environment for VSAN.
vBoring VSAN Series:
- VMware Virtual SAN 6 – Requirements [Part 1]
- VMware Virtual SAN 6 – Setup and Configuration [Part 2]

VSAN Requirements:
Here are the minimum requirements to build out a VSAN environment.
Refer to VMware KB article 2106708 for an in depth breakdown of all requirements.
- Minimum of 3 ESXi 6.0 host that contribute storage
- At least one SSD and one Hard Disk per host
- Hosts need I/O controller supporting Pass Through or RAID 0 (prefer them to be on the VSAN Hardware Compatibility List)
- VMkernel port configured for VSAN traffic
- 1 GB network for small test/lab environment (VMware recommends 10GB)
- If you are deploying VSAN in your test/dev/lab and the 60 day evaluation period isn’t enough check out the VMUG Advantage subscription for a 1 year license.
Additional Planning & Design Documentation:
There are many resources available to help plan your deployment of Virtual SAN.
- VMware Resources (Latest version of all VMware VSAN documents)
- VMware Virtual SAN 6.0 Documentation
- VMware VSAN Hardware Compatibility Guide
- VMware Virtual SAN 6.0 Proof of Concept Guide
- VMware Virtual SAN 6.0 Design and Sizing Guide
David Davis has an amazing PluralSight course on VMware Virtual SAN that I highly recommend. If you haven’t checked out PluralSight it’s an amazing service!
Preparing the hosts for VSAN:
First we must setup the physical environment for VSAN starting with the disks. This part is near impossible to create documentation that will work in every environment as it is hardware dependant. I will walk you through my environment so you can see the process and compare to your environment. The end result is you want your disks to have no partitions and able to be seen by VSAN either by passthrough or RAID 0.
Since this is my home lab two of my I/O controllers and my all of my SSDs aren’t on the VSAN Compatibility Guide. If you are deploying VSAN in a production environment you will want to ensure everything is on the Guide.
ESXi Host 01:
- Dell PowerEdge T620
- Storage Controller: Dell PERC H310 – Supports passthrough (Not on VSAN Compatibility Guide due to low IO throughput)
- Disks for VSAN: 1 x SanDisk SSDs, 3 x 300GB 10K SAS
- Network: 1 Gb
ESXi Host 02:
- Dell PowerEdge T620
- Storage Controller: Dell PERC H310 – Supports passthrough (Not on VSAN Compatibility Guide due to low IO throughput)
- Disks for VSAN: 1 x SanDisk SSDs, 3 x 300GB 10K SAS
- Network: 1 Gb
ESXi Host 03:
- Dell PowerEdge R520
- Storage Controller: Dell PERC H710P Mini – Does not support passthrough but does support RAID 0 (On VSAN Compatibility Guide)
- Disks for VSAN: 1 x SanDisk SSDs, 2 x 300GB 10K SAS
- Network: 1 Gb
VMware recommends the following RAID 0 options:

Configuring Dell R520 with PERC H710P Mini I/O Controller:
The PERC H710P Mini I/O controller does not support passthrough mode and will have to use RAID 0. In the Dell PERC Configuration Utility I created a RAID 0 virtual disk for each physical drive.
I added 1 physical disk then per the VSAN Compatibility Guide set the following options:
This is what the end product should look like. Each disk should be in its own RAID 0.
Configuring Dell T620 with PERC H310 I/O Controller:
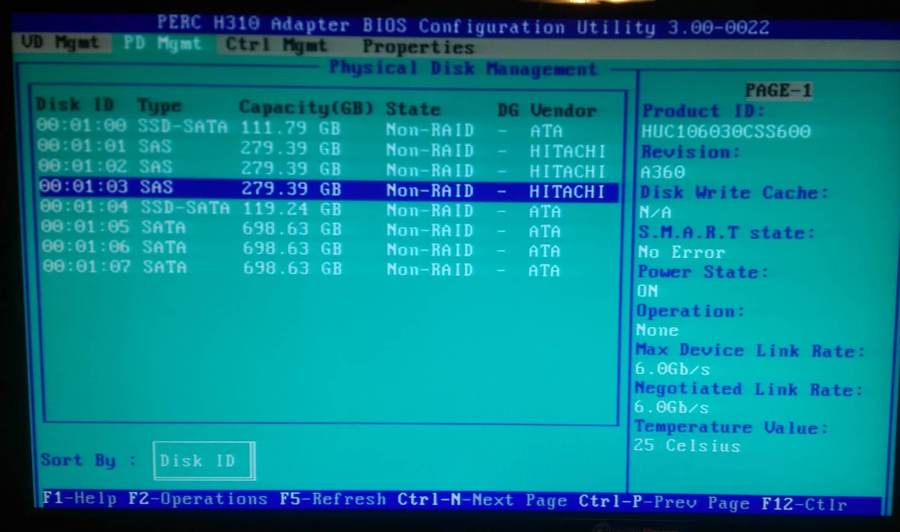
The PERC H710 Mini I/O controller is not on the VSAN Hardware Compatibility Guide but has the ability to do disk passthrough. For passthrough you will set each disk to Non-RAID in order for ESXi to see the storage.
To change the mode to Non-RAID hit F2 then arrow down to “Convert to Non-RAID”
It will inform you the disk will be formatted. Hit enter on Yes to proceed.
Once all your disks show Non-RAID ESXi should have no issues seeing them.
To check if your disks are showing up go the the Storage Devices in either the thick or web client. If you configured them correctly they will be found here:
Host -> Manage -> Storage Devices
If you used RAID 0 to setup your storage your flash disks will show up as HDD. The reason for this is when the disk was configured for RAID 0 it masked the information about the drive. There is a way to mark them as flash though!
Select the disks that are you flash drives. Click the button below to mark the selected disks as flash disks.
Click Yes on the confirmation:
Now the drives show up as Flash.
Now the environment is ready for VSAN! Continue to Part 2: Virtual SAN – Setup and Configuration


